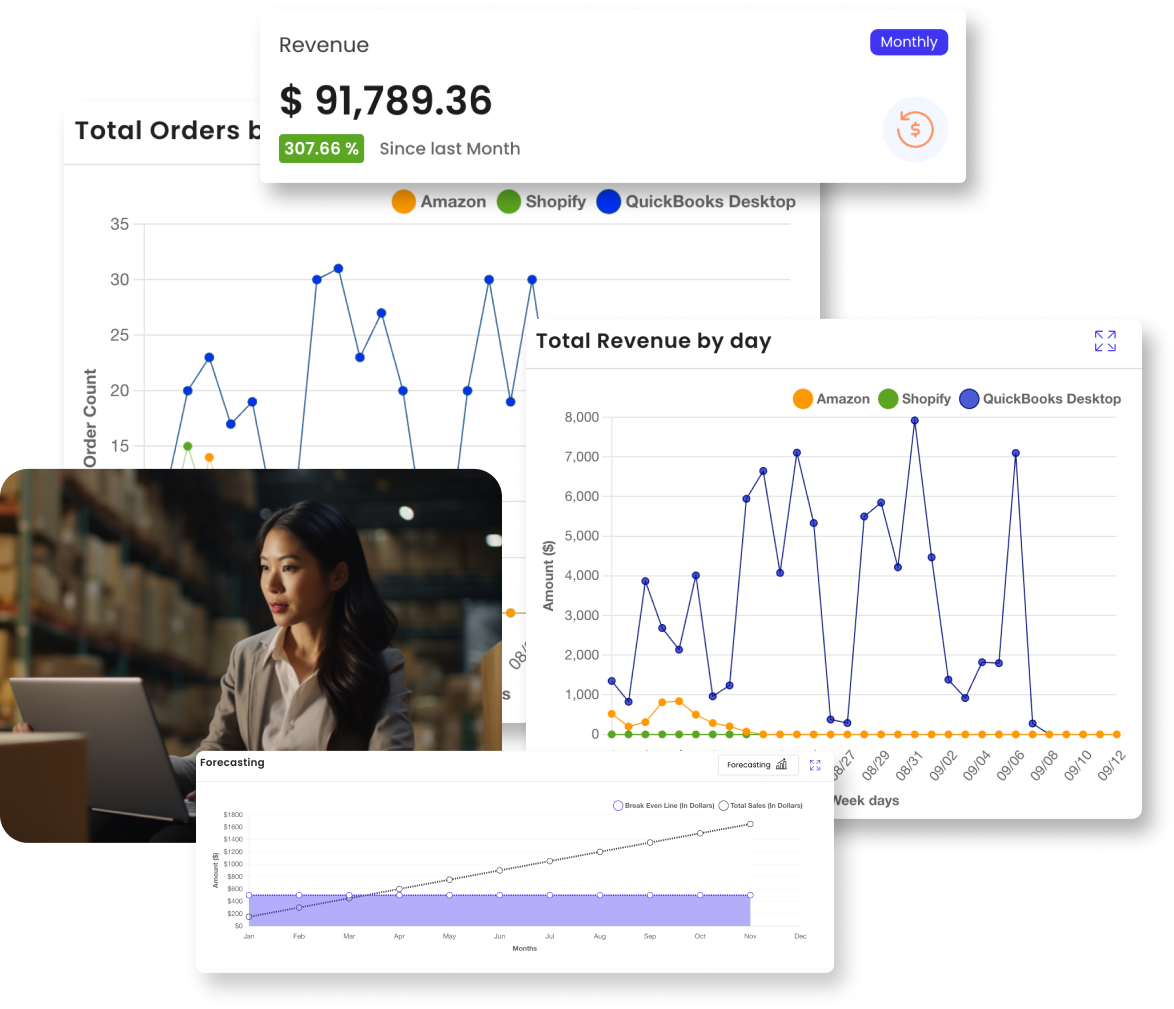
Automating your e-commerce data into QuickBooks shouldn’t be a hassle. With these 4 steps, you will be prepared and ready to automate your data entry into QuickBooks!
We understand that owning an online e-commerce store comes with a lot of moving pieces. Tasks like bookkeeping, inventory management, manual data input, marketing to the right audience can become daunting and time-consuming.
Deciding whether to pursue an automation service for your business can seem like a complex task, especially when it gets in the way of your day-to-day tasks.
What if we tell you that here at Connex, our core company value is to “simplify” and help small business owners like yourself be prepared to use our automation wizard with not hassle.
By executing these 4 steps, you will set your business up for success all while saving you time and money! While trusting Connex to automate your data entry into QuickBooks, you will be able to solely focus on what you do best: grow your e-commerce store!
Step 1. Set Up Your Accounting
Before automating your data into QuickBooks Desktop or Online, you must first sort out how much time and money you’re wasting with manual data entry. Lucky for you, Connex has a Potential Savings Calculator where you can estimate time wasted and how much you’ll save in automating your data entry into QuickBooks.
In order to sync your data accordingly, your chart of account must be built out and contain at least one of the following account types:
- Accounts receivable (A/R) account
- Item asset account
- Item income account
- Cost of goods sold (COGS) account
- Discount/refunds given account
- Undeposited funds
Connex Tip: Most business owners and staff spend an average of 5-10 hours a week manually entering data into QuickBooks. This is costing you and your business hundreds of hours and thousands of dollars a year.
Step 2. Match your Products SKUs in QuickBooks
Whether you handle products in house or outsource, you must be able to organize and identify every item SKU in QuickBooks. Your product SKUs should match the item name in QuickBooks in order to automate your data correctly. Continuing to manually enter this information by hand, will both be time-consuming and prone to errors. To simplify this process by using Connex’s automation wizard, you must match your products in your online store to QuickBooks. What does this mean?
In your e-commerce store, each product will have a unique SKU. Every time you sell that product you will need to reconcile it in QuickBooks. In order to keep track of your sales and inventory, you want to make sure your product SKU matches the QuickBooks item name field.
Once you’ve matched the SKUs to the item name in QuickBooks, you are now able to automate the data entry of your sales into QuickBooks. Easy, right?
Connex Tip: This process can be daunting and at times need a visual to understand. We got you covered. Check out our Product Matching Best-Practices video.
Step 3. Match your Deposits to Sales in QuickBooks
Starting a small business is no easy task, and knowing exactly where your money is going is essential for growth. To avoid any income being recorded twice, you must match your deposits with QuickBooks. Otherwise, your merchant account fees will be missing, and you will be taxed an added expense. To add fees, you must match them to a group of orders and deposits from your bank.
When you are paid online, the payment processor you choose will collect the funds and holds them in a staging area to clear. Most processors take a commission of about 1-3% per transaction before they deposit. In order to pay no taxes on these fees, you must add them as an expense.
Connex Tip: Need a visual clarification of this process? Watch our Deposit Matching Process video and read our Help Center article.
Step 4. Match your Customers in QuickBooks
We understand that managing all your customers in QuickBooks might seem like a no-brainer, but with software limitations and sync issues, we beg to differ. QuickBooks is not meant to be a CRM tool, and issues can arise when too much customer data is stored.
QuickBooks has a customer limit of approximately 100,000 in QuickBooks Enterprise. We recommend adding all customers under a single customer, unless your company performs regular business with the same clients. Our automation wizard will map all wholesale orders to a company and all orders from individuals as internet sales.
Connex Tip: Not quite understanding how to match customers into your QuickBooks account. Read more and learn the process by checking out our How Does Connex Match QuickBooks Online Customers? article.
At Connex, we want to set you and your business up for success by getting you equipped to begin the automation process with no surprises or issues. Below you will find a short summary with a checklist of what you need to do before getting started. Now that you know the 4 steps needed to take before automating your data entry into QuickBooks, we are confident that you’ll thrive in using Connex!
Checklist Summary
- Make the transition from manual data entry to automation smoothly by being organized with your accounting and product inventory.
- Be sure your accounting charts are built out and are following the automation requirements Connex listed.
- To keep track and sync your inventory without any issues, be sure each item matches the unique product SKU in your QuickBooks account so Connex can sync the data accordingly.
- As a business owner, any additional expense can add up and be costly. To avoid any duplicates and merchant fees, match your deposits to sales.
- Keep your CRM separate from your QuickBooks; match your customers under a single display name and Connex will match it automatically.
- Once you’ve completed these 4 steps, you’re ready to start using Connex with your QuickBooks account!
Is Connex The Right Automation Tool Your Business?
Most of our customers sell on multiple e-commerce channels. For example, Woocommerce, Shopify, Magento, and ShipStation, just to name a few.
They want to grow their business, and they also value the peace of mind from knowing their books are always up to date and they can serve their customers.
Why Our Customers Choose Sync with Connex
- Developed specifically e-commerce business owners
- You can scale your business by automatically syncing sales & inventory from multiple e-commerce platforms to QuickBooks Desktop or Online.
- You don’t have to spend your resources manually entering sales, inventory, and customers into your website and QuickBooks accounts.
Recommended by Intuit itself, Connex for QuickBooks will give you peace of mind that your inventory will be updated. You will be free of the frustration of oversells and missed items.
- When your inventory is up-to-date, you can achieve higher customer satisfaction, leading to more positive reviews, and increased sales.
- For phone orders, we can sync sales from QuickBooks to your shipping solution.
- If you sell on multiple channels, you can simplify by using our solution instead of multiple tools.
- Connex integrates QuickBooks with all major e-commerce platforms, such as Woocommerce, Shopify, Magento, Amazon, and e-commerce shipping solutions such as Shipworks, Ordoro, and Shipping Easy.
–Click here for a full list of our ecommerce, shipping, and payment integrations
How can you decide whether Connex is right for your business?
The easiest way to tell whether Connex is right for your business is to try it out.
- Connex is easy to set up on your own.
- If you would like us to set it up for you, your purchase includes a complimentary onboarding by our team.
- Get started with a month-month plan, and upgrade to annual to save 20%.
- Your purchase includes access to a US-based technical support team via tickets and screen-sharing.
- In case Connex does not work for you, we offer a 30-day 100% money-back guarantee.